Arun Prasad Ramanuja Doss
Creating Repository:
Prerequisites
- Standard version of Installed on your Machine
- Access to your organizations Devops portal – https://devops.yourorg.com
- Created Project in devops.yourorg.com with access for your Organization account
- Windows PowerShell or any other terminal to enter specified commands
- Existing knowledge on basic handling of, refer this Git Document.
Procedure
- Create a new Repository in your Project (if there is no existing repository)

- Select suitable .gitignore configuration based on your project type[@2]
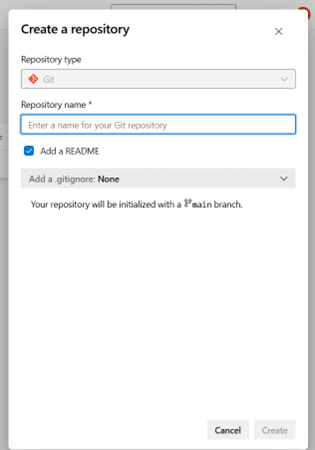
- If it is a fresh project create new project folder, If you already have the project file Go to existing directory (make sure you have a standard version of installed on your machine). And enter
- git init
- Rename your branch from ‘/master’/ to ‘/main’/, as azure Devops default branch is name main:
- git branch -M main
- Add the remote origin as the new repository URL
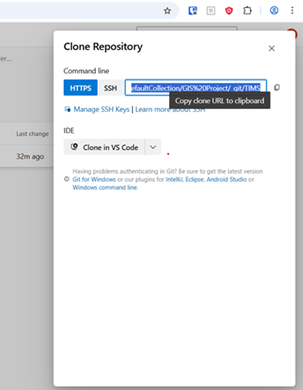
- git remote add origin https://devops.yourorg.com/DefaultCollection/your-repo-path
- Disable SSL Verification for temporarily (to be replaced with install SSL certificate)
- git config –global http.sslVerify false
- Set windows credentials manager as default credentials store for, (to be updated for Mac machines)
- git config –global credential.helper wincred
- Go to Credentials Manager in Windows, if you have any pre-existing credentials for the same domain remove it and click “Add a Windows Credentials”
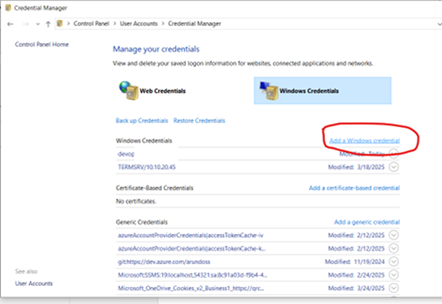
- In the pop-up enter Internet or Network Address as ‘devops.yourorg.com’, your username with ORGANIZATION domain(e.g. ORGANIZATION) and your Organization account password, ** If your Organization Credentials are updated the same have to be updated here as well. Press Okay and your credentials is now created.Steps 6 to 9 is a one time setup for the machine, once completed don’t have to repeated for setting up other repositories from Organization Devops server.

- Pull your repository from the origin.If fresh repository your setup is finished. If you have existing codebase skip Step 10 and start from step 11.
- git pull origin main
- Pull from the remote repository
- pull origin main –allow-unrelated-histories
- If you’re getting any merge conflicts, resolve them refer this document.
- Add all your changes:
- add .
- Commit your codebase with message
- git commit -m “Initial Commit and your description here”
- Push your changes to remote
- git push origin main
Your setup is now finished and your codebase is now available in the Devops Repo.
Creating Release Pipeline
Introduction
Release Pipelines are meant for projects where there is no build process involved, if Build is part of the project to use this pipelines method the artifacts for deployment should be created using a Build Pipeline and then released using Relase Pipeline.This part of the document only covert the repository which does not require any build process.
Prerequisites
- Standard version of Installed on your Machine
- Access to the Organization Devops portal – https://devops.yourorg.com
- Created Project in devops.yourorg.com with access for your Organization account
- Ready to deploy project for Dev or Test Environmnet
- Finisished the previous step “1. Creating Repository”
- HTTPS Access to the Azure devops Portal from the Deployment Server thorugh port 443
Procedure
Create a new Agent Pool
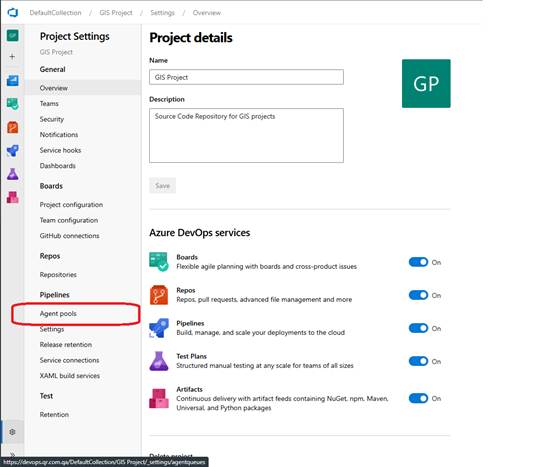
- Login to the DevOps Portal from the deployment server (in our case UAT), open your project and open Project Settings.

- Select Agent Pools and then select New Agent
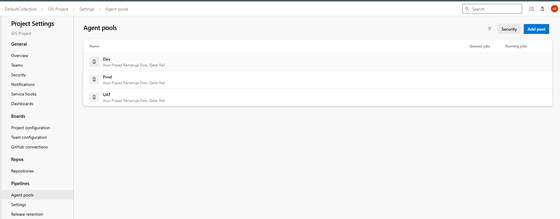
- Click New Agent and the Add Agent Pool dialog appears, fill in the Name and Description details and clikc Create.
Download the PAT
- PAT (Personal Access Tokens) are the one time secret keys that we can use to authenticate various clients such as Agents, Git Client etc., with our server, To Create a New Agent we have to create and Download PAT from DevOps Portal. Click on the profile Icon in the Top right side of the DevOps Portal and select “Security” in the dropdown.
- Click the New Token Button in the following User Settings Screen
- Create a new personal access token dialog appears in which enter a Name, select All accessible organizations option under Organization and Full access Radio button under scopes
- The success window with the PAT appears, copy the token and close the window. (maybe a encrypted excel sheet) and dispose it once tasks is completed.
- You can come back to this same location and revoke it once the activity is completed.
Configure the Agent in the Server
- The New Agent Pool is create, click the newly created Agent Pool and Click New Agent in the below screen.
- Use the Download button in the Dialog to download the agent installer package (vsts-agent-win-x64-3.238.0.zip) in your servers Download folder.
- In this setup We are going to extract the Zip file under a Directory name DevOpsAgent in E: Drive(any other Location can be used). Extract the Zip file in the E: Drive and rename it as DevOpsAgent.
- Now Open a Command Prompt in Administrator Mode and navigate to the path to the DevOps Directory in our case “E:/DevOpsAgent”.
- Enter the config.cmd Command to start the configuration script. It prompts for the server URL, enter our devops server url(https://devops.yourorg.com).
- Press Enter once to keep PAT as the authentication type and enter the token that have saved in the previous section in the next prompt
- Enter the Agent Pool that you want to configure this server as Agent, In our case UAT.
- The next prompt will ask for the Agent Name which can be either the server name or the project specifica use name (like Web Server, Reverse Proxy etc.,)
- Keep the default name for Work folder and Enter Y in the next prompt to Run Agent as Service (which is helpful, to control the start and stopping of the DevOps Agent from the services utility)
- Enter SERVICESIDTYPEUNRESTRICTED as Y for having unrestricted access for the deployment of the application.
- Enter the Service Account of the server with Admin Rights as the User account in the next prompt with domain (eg: *ORGANIZATION) followed by its respective Password.
- Enter N to the next prompt so that the service will be started immediatly
- The service is now configured successfully. You can check the same from services.msc
- You can also see the agent now in the DevOps Portal.
Disabling SSL Verification for Git in the Server (if needed)
- The Agent Server have to installed with the Git (special use case for specific Organization environment, if needed) so that the global config can be updated to disable SSL authentication. Copy the latest version of Git for Windows to the server.(the installer is available in S:/Customer Portal/softwares/Git-2.xxx.exe)
- Install the Git using the windows installer on the server.
- Upon successful installation, open Git Bash and input following commands to disable SSL verification.
- git config –global http.sslVerify false
Creating the release Pipeline (Only to Copy)
- Go to your Project in DevOps Portal and Select Pipelines -> Releases
- Click Create Release Option to Create a new Release Pipeline
- Click Add an Artifact Option and select Azure Repos as the Artifact Source Type
- Select Your Project Repository as Source and Select a Default Branch for Release (you can create different release branches for Deployment like uatrelease, devrelease, betarelease., etc.,).
- Keep the Source Alias as default and click Add
- Click Apply to select Empty Job as the Template and the Stage will be created
- Now Click Tasks tab to add Tasks to the created Stage
- Click the + icon in the Agent Job Tile, the Add tasks screen appears
- Select “Copy files” option and Click Add Button
- Click ‘Browse Source Folder'(there dots) near Source Folder Column and Select your project Folder as Source and Click Okay.
- Enter your Deployment folder in your server(can be a IIS folder or Apache folder etc.,) as the Target Folder.
- Expand the Advanced Options and Select enable Clean Target Folder and Overwrite options.Also keep the Retry count as 3, to avoid any simple network level failures.
- Click Save Button, select All Pipeline as the folder and Press Ok to save your Pipeline.
- Hower over the Name of the Pipeline New Release Pipeline and click to input a appropriate name. click Save, so that the new Name is updated
Releasing your first Deployment
- As the Relese Pipeline is now created. We can test the same with Going to Pipeline -> Releases and select your release and clicking Create Release Option file:media/clickCreateFirstRelease.png
- Click Create Button and the New Release will start using the latest available Commit from the configured Git Branch file:media/createManualRelease.png
- Now the Release will be staged and completed. Click the Stage 1 text to get the detailed status. file:media/manualReleaseStageSucessfully.png file:media/detailedSummaryOfManualRelease.png
Automating the Deployment by Git (Non-Production)
- The Manual Deployment is suitable for Prod Release Cycle, for continuos Development and Testing Environments like Dev and UAT it is preferred to automate the Deployment using Git Commits. Go to Pipelines -> Releases option and select Edit button. file:media/selectEditOptionOfUATRelease.png
- Click the Deployment Trigger(lightning symbol on top of Azure Repository) to open Continuos Deployment Trigger option file:media/openContinuosDeploymentTriggerOption.png
- Enable Continuos Deployment Trigger and Click Add button to add a Branch trigger file:media/clickAddBranchFilterForTrigger.png
- Leave the default Include as Type and choose your Release Branch in the Brach dropdown.
- Close the Dialog and Click Save to Save the Release Pipeline. From now on whenever your Release Branch is commited with new changes, the deployment will be automatically done. file:media/saveUpdatedTriggerToPipeline.png
Conclusion
This automation steps make the whole Application Deployment Cycle Simple and Auditable.